 |
 |
Do it yourself
| May 10th, 2015 at 6:07:09 PM permalink | |
| AZDuffman Member since: Oct 24, 2012 Threads: 135 Posts: 18222 |
Picture a piece of 2x6 5' long. It is a rectangle. Picture cutting it at an angle from one corner to the other, so you have 2 right triangles whose long side is now 5', who's short side is now 6" and the hypotenuse is 5.02'. The "factory" flat side sits on the ground and the "hypotenuse" is the angle of the steps. So it sounds like you did what I did, more or less. But there *has* to be a *right* way to do this. I've seen wood cut this way and better than I did. And you did?
Still would have had to rip them. Might have worked, but I needed just a 6" rise or so.
They are grandma and pa, though thank god not by me! The kids are very tame and behaved, bur the cheaters have 4 deck screws in, so I have confidence. But good idea!
Bonk away, I will retort though that the stamp are up because I took the time to fit the lumber to minimize gaps. So perhaps I get a pass on a bonk? :-) The President is a fink. |
| May 10th, 2015 at 11:24:06 PM permalink | |
| Face Member since: Oct 24, 2012 Threads: 61 Posts: 3941 |
Ah, so yours just lies on the ground for the entire length of the ramp. See, mine only touch at the top end, where they lie on the cement pad, and the bottom end, where they sit on the ground. All of the middle floats. My cuts were much more severe in angle, similar to this...  Of course, with the 4" of cement pad, then the 4" into the shed, I effectively had two "steps", so I could lie my joists on the first one. That wasn't an option for you.
No bonk needed. You're covering it with non-slip, so of course reducing gaps takes precedence. Reducing gaps always does anyways, but I'd have just teased you for not sanding them off =p Pretty much the only other possible critique I could come up with is not using the bracket idea for the first deck board and instead using liquid nails. I'd worry, especially with the weather and constant hammering with shovel, that it would loosen. Of course, I'm am not in any way, shape, or form an adhesive expert, so that could be a total non-issue. They say wood glue is stronger than the wood itself, but heat cycling and the expanding/contracting would have me wondering how long it would last. I guess we'll find out =) Be bold and risk defeat, or be cautious and encourage it. |
| May 10th, 2015 at 11:54:20 PM permalink | |
| petroglyph Member since: Aug 3, 2014 Threads: 25 Posts: 6227 | I like "gaps". When the boards are to close, the gaps are filled with pine needles or other detritus which stays wet and enhances rot. The bevel cut you mention is a real difficult cut IMO, and dangerous. If you want to use a circular saw you are talking a 12 inch blade, IIANM? Whenever you open or expose wood like that, assuming it is in some stage of cure, you immediately expose a large face area to air. It's best to get it nailed down fast before it warps. The last official act of any government is to loot the treasury. GW |
| May 11th, 2015 at 12:17:46 AM permalink | |
| Evenbob Member since: Oct 24, 2012 Threads: 146 Posts: 25013 |
I use wood glue for everything. I have old sandals that are coming apart and just glued them today. The secret is the clamping. In 24 hours anything you glue is damn well glued. Modern Marvels did a whole show on glue years ago, it's amazing stuff. If you take a risk, you may lose. If you never take a risk, you will always lose. |
| May 11th, 2015 at 10:00:54 AM permalink | |
| Face Member since: Oct 24, 2012 Threads: 61 Posts: 3941 | This might only be of interest to maybe OG, but... DIY spinning reel repair / maintenance. Let me preface this by saying - DON'T EVER DO THIS!! Lol, they're $25, save yourself the hypertension and possible stroke and just buy a new one. But, if you just bought it and now it's junk, or you really want to save a buck, here's how to do it. Reels are all gears and bearings. It takes but the tiniest fleck of sand or dirt to get in there and your reel turns into a grindy, clunky frustration piece. The best way to prevent this is to keep them dry. One dunk into the crick or the swamp, and you can imagine all the suspended junk that's gonna flow into your bits. But, even if you never dunk them, a bit of dirt on the outside (fishing is dirty work) plus a touch of rain (which you will find yourself in eventually) will flush something in there and mess up the works. What you'll need is a very small screwdriver set (like one used for electronics, eye wear, or similar), a clean rag (lint free!), degreaser (I use brake cleaner / acetone), and reel grease (available anywhere that sells fishing gear). First thing you'll do is remove the spool. You can leave it on and just tie off the line somewhere, but I find getting it right off is best. This way you don't have to worry about line coming loose and tangling, nor fouling up your line with a bunch of grease (you will get grease everywhere). So loosen that drag knob on top all the way until the knob comes loose, remove it, and the spool pulls right off. 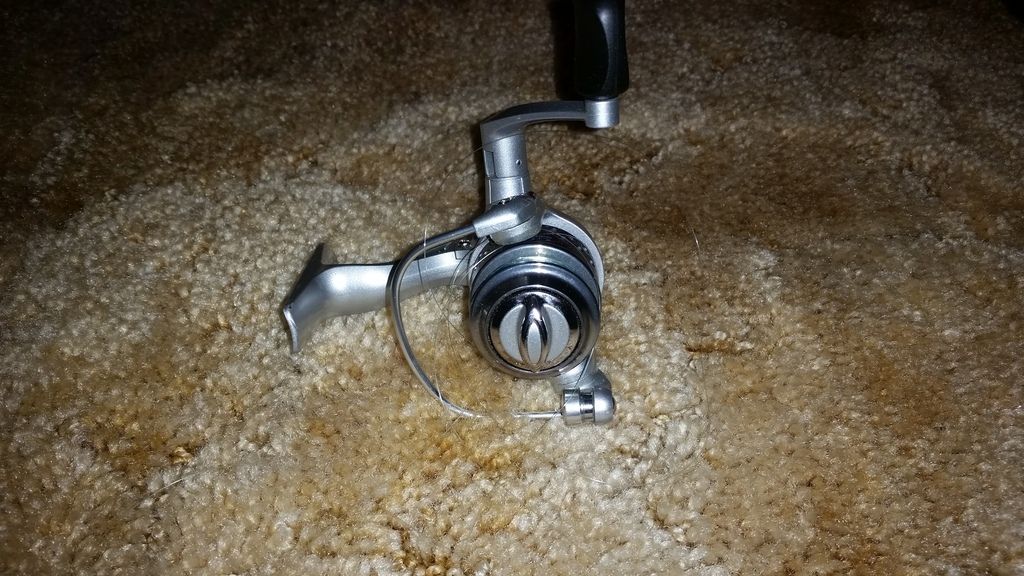 Your spool will have a bunch of spacers and washers under that drag knob. BE GENTLE! You don't want them to go flying and get lost, or fall out in a way you don't know how to put them back on (this particular reel has SIX). Once the spool is off and set aside, you need to remove the handle. On the opposite side of the handle there's another knob. Just loosen and remove it, and the handle will pull right out. 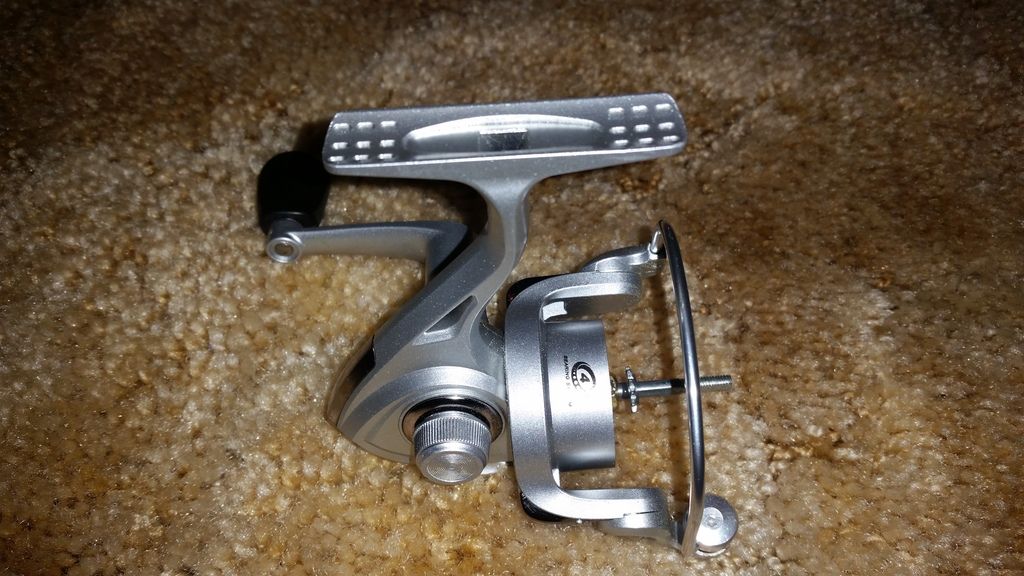 With the handle off, you can open the body. This is where you're going to f#$% it all up. These three screws hold mine on, but the cover for these is always made in a way that they're difficult to remove without prying. You can gently pry without worrying about damaging anything, but try many different angles before trying added pressure. More pressure equals a more explosive release, and then a bunch of bitty parts are gonna go flying and you'll have no idea how to get it back together. 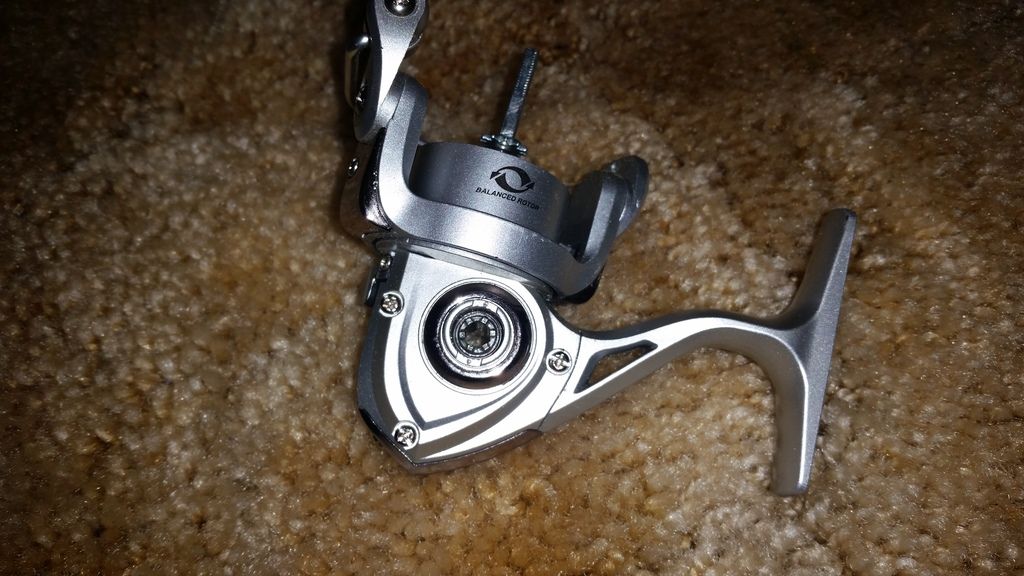 Once off you'll see the guts. No tools are needed here. First is the ball bearing, which you can see right on top here. This is almost certainly your culprit. Just pull it off careful to mind the washer under it. It's small and may stick to it due to grease. Set it aside. 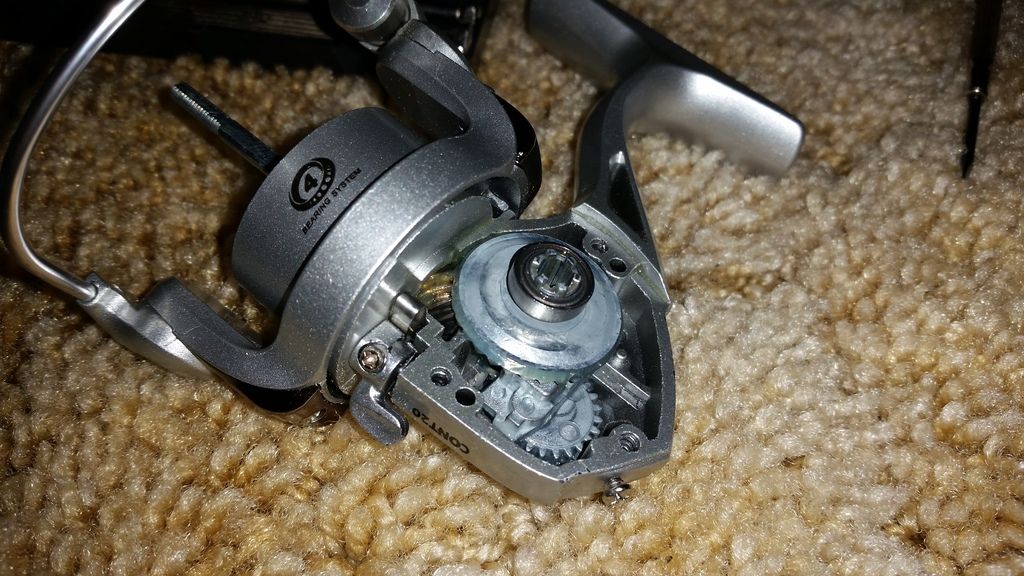 Next is the "wheel" which also just sits in there. Simply pull it out. 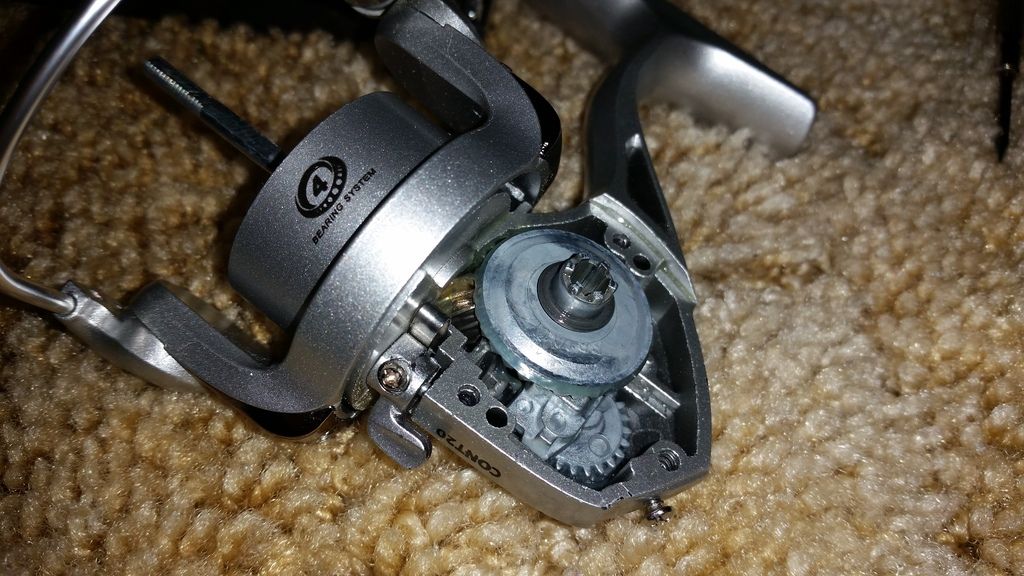 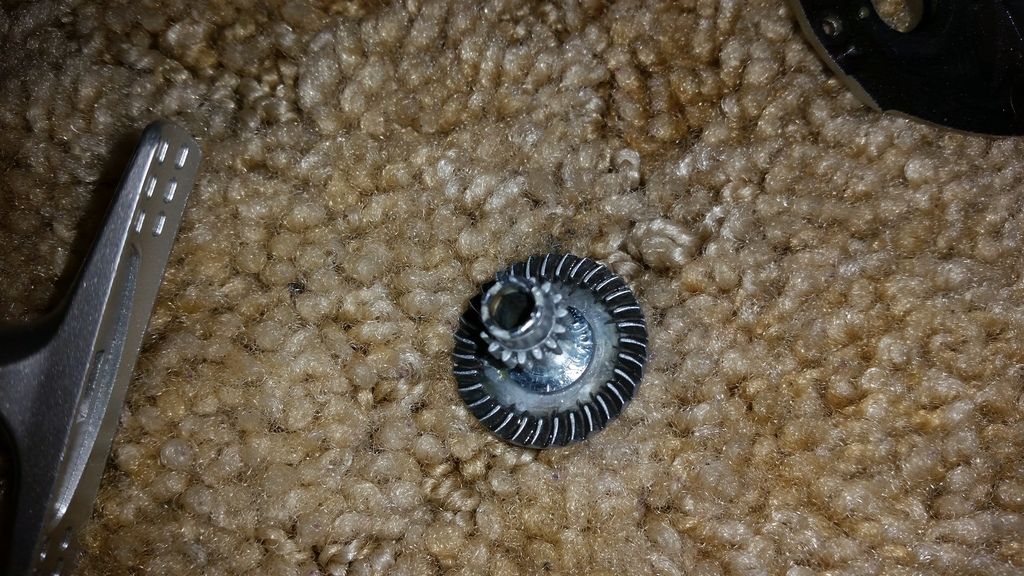 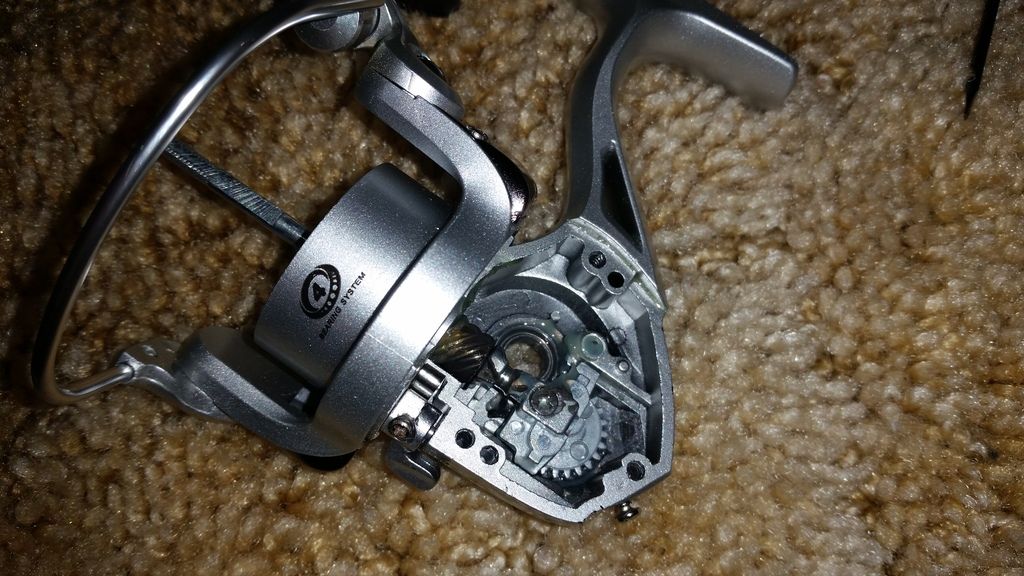 Now you're fully disassembled. The wheel you pulled out and the worm gear it sets on are packed with grease, which can hold dirt and sand. Using the brake cleaner, blast them both clean. Feel free to pick through the grooves to ensure you got it all. Just wiping ain't gonna cut it, the grooves are too deep and too close together to get in there. You can use the screw set you used to disassemble it to scrape out the grooves, but I find toothpicks work better. You also want to especially flush and degrease that ball bearing. One grain of sand in there is gonna give you the clicking and catching, and I'll almost guarantee this part is why you opened this damnable contraption in the first place. So pay special attention to it. Once all blasted clean, wash your hands and grab the new grease. I prefer finger application as you can ensure they're clean, and you can be sure you get grease everywhere you need to. With some on the tip of your finger, press it into the worm gear then spin the reel with your other hand. This will cause the gear to turn and your greasy finger will ensure you pack it full around the entire circumference. With the worm gear packed, you needn't worry about the wheel. Grease it if you feel like it, or just set it back into place. Use your finger to repack the bearing, then set that back into place on the wheel (don't forget that washer if you removed it). Once that's back on, pry that cover back on and screw it in. Again, try different angles before you try more pressure. You're still in danger of an explosive release that sends parts flying. Lastly is reattaching the handle and spool. The handle is no issue, but don't forget those spacers in your spool! The shaft that goes through the spool has a tendency to pop those spacers out; if you just jam it on, they'll go flying. Get the spool on, tighten the drag nut, and you're done! Should take about an hour. Once together, give her a few spins to work in the grease and ensure you did a good job. And when you find the reel approximately 800% worse than when you began, throw it against the wall and swear to never do this again =D Be bold and risk defeat, or be cautious and encourage it. |
| May 12th, 2015 at 11:00:17 AM permalink | |
| petroglyph Member since: Aug 3, 2014 Threads: 25 Posts: 6227 | How do I get rid of pigeons within city limits? The last official act of any government is to loot the treasury. GW |
| May 12th, 2015 at 11:30:32 AM permalink | |
| Face Member since: Oct 24, 2012 Threads: 61 Posts: 3941 | Erect a life sized plastic owl on the property. Or buy an airsoft and work on your covert ops Be bold and risk defeat, or be cautious and encourage it. |
| May 12th, 2015 at 11:55:02 AM permalink | |
| petroglyph Member since: Aug 3, 2014 Threads: 25 Posts: 6227 | I have a bird feeder and enjoy the migratory birds and native species. They imported pigeons to make the London Bridge more authentic [as if it weren't, lol]. Pigeons don't belong in the desert and filthy up the bird bath with one douche. I bought a nice air pellet rifle but it zings them out there at over a 1000 fps. I am afraid to launch it in my neighborhood for fear of ricochet. They are pigs and subtract from the joy of bird watching. I don't really want to kill anything I'm not going to eat. The pellet gun was for stray cats, but same problem. I fired this once at a somewhat used burning barrel and it went through one side. The last official act of any government is to loot the treasury. GW |
| May 12th, 2015 at 12:46:27 PM permalink | |
| Ayecarumba Member since: Oct 24, 2012 Threads: 89 Posts: 1744 | Has anyone had success with one of those cheap laser pointers? I would second the plastic owl idea, but it will also keep the birds you do want away. Airsoft is a good idea. It shoots a plastic pellet that won't penetrate skin. On the other hand, it shoots a plastic pellet that won't be digested if ingested. Hmmm, netting? |
| May 12th, 2015 at 1:19:56 PM permalink | |
| petroglyph Member since: Aug 3, 2014 Threads: 25 Posts: 6227 | I am thinking about using netting or hog wire to let in the little ones and keep out the big ones. I watched some show though that illustrated using netting like that is how they catch hawks and falcons. I've got them and kestrels. It would break my heart to accidentally kill one of them. The plastic pellet idea would work for a while. We have chased them off by chasing them, throwing rocks, and spraying hose at them. It all works for a few minutes. But they are tenacious bastards, the minute we go in from the patio they are back on the feeder like fly's on stink. I caught 3 of them in a live trap and the plan is to drive them to Laughlin and release them. With any luck they will go crap on Don's new statue of himself. : ) I thought about one of the RC cars and chasing them around for laughs and grins, it all works, for a few minutes. The flock is building on me. It was funny when just 3 of them were hanging around and living in my neighbors air conditioner. But now, since I put up a feeder I am up over dozen and building. I stopped feeding and they go away after a few days, but they remember and come by and check, and the little guys just look at us with big sad eyes and go cheap. A good dog would stop them from landing, but it would require me shoveling a ton to dog pooh. It's rough out in the desert, 95* yesterday. The last official act of any government is to loot the treasury. GW |