 |
 |
Do it yourself
| April 29th, 2015 at 4:31:16 PM permalink | |
| Face Member since: Oct 24, 2012 Threads: 61 Posts: 3941 | A few dumb things for today... For those who don't DIY because you don't think you have the skills... just try. Beginner DIY is all confidence and willingness. Do that, and the experience will just come. Even if you have no idea, just do something. You never know what you might learn. Case in point - lawn mower wouldn't start. I'm not terribly familiar with small engines, but what the hell. It Doesn't Hurt To Try. 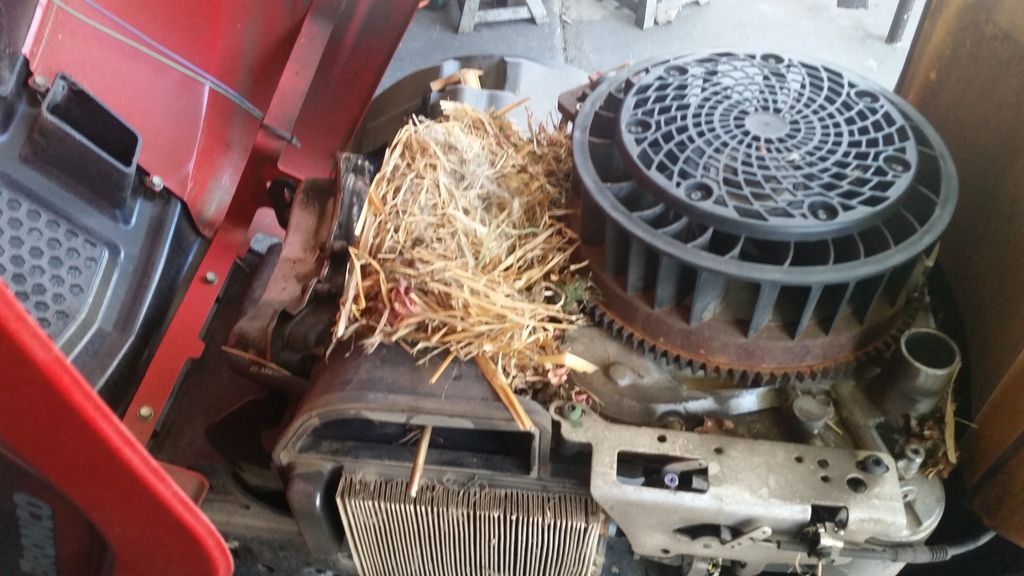 Just a mouse nest, all crammed around the head and in the airbox. Pulled it out and it fired right up. I may have not been charged by the shop, provided they were decent, but that's still a day of loading, transporting, unloading, and all the gas to do so. Minimum $20 and a day of BS turned into 7 minutes in my garage. Boom. Done. Or you could be all "woe is me" and invite people into your wallet. Your call. Next is a product of my characteristics. I'm poor, a cheap bastard, try to minimize my use of resources, and rail against our disposable culture. So I do a lot of redneck rehab, rehab such as this... 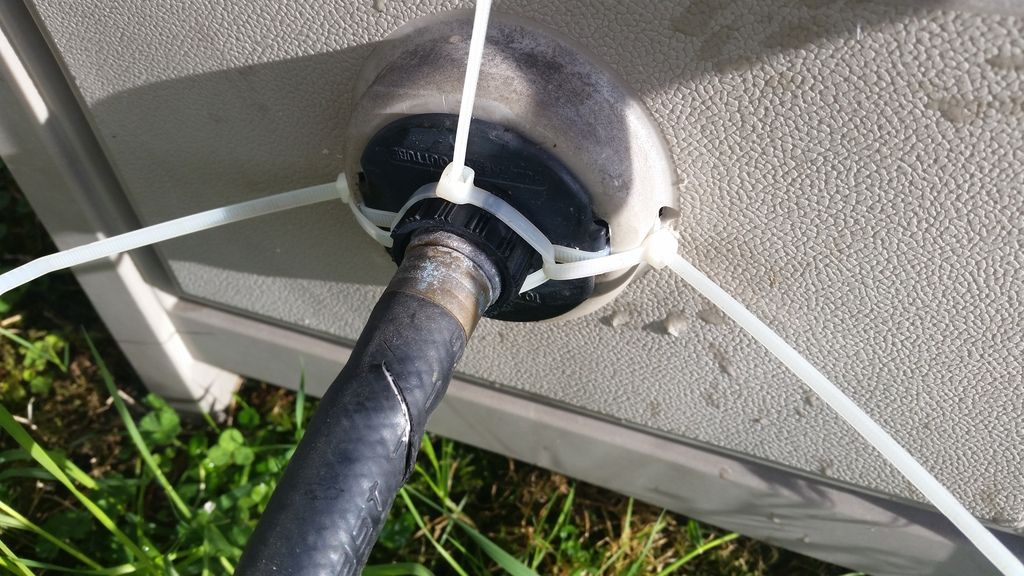 This is the feeder hose that connect an outdoor spigot to a garden hose reel. The black plug has tabs that lock the hose into the reel itself. Well, they snapped. As soon as you turned on the water, the pressure popped it out and the reel was garbage. So, I drilled a hole in each side, fed a ziptie through the hole and through the slot where the tabs insert, and made a loop on each side of that plug. Loop another one through these loops on the sides, pull them all tight, and viola! The ziptie in the slot sandwiches the tabs in place, and the third ziptie around the plug ensures it ain't going nowhere. Not only does it work, but it doesn't leak a drop. These reels are $50.00 minimum. Or, with a little bit of confidence and 2 minutes of consideration, you can fix it in 5 minutes for about $0.35. Beer, race cars, fishing gear, firearms... there's so many better thing to spend your hard earned money on. DIY and preserve that bank account =) Be bold and risk defeat, or be cautious and encourage it. |
| April 29th, 2015 at 6:40:24 PM permalink | |
| Fleastiff Member since: Oct 27, 2012 Threads: 62 Posts: 7831 | Now you know why pilots, particularly those in rural areas, carefully inspect their planes, even those that have been carefully hangared. Face: Please amend your list of "better things to spend money on". It should be: Angie, Beer, race cars, fishing gear, firearms ... . Otherwise there is liable to be a clip or two of "stray rounds" heading your way when Angie notices her omission from your list. |
| April 29th, 2015 at 8:44:13 PM permalink | |
| Face Member since: Oct 24, 2012 Threads: 61 Posts: 3941 |
Yes indeed. Fortunately my shed isn't packed; it only stores large equipment, not every little thing I only use occasionally. But I did have a bale of hay in there, leftover from Halloween and saved for when I reseed the old pool crater. I hope maybe with a clean out it will discourage the mice from nesting, but as it's on the edge of the property, there's still plenty of grass for them to harvest and rebuild. I guess we'll see.
It's Ashley, and we're sort of on the outs. It's been a trying year with a lot of changes; I suppose we're debating whether we want to change together or go our own ways. We still talk daily, but I've been living alone for at least a month now. Be bold and risk defeat, or be cautious and encourage it. |
| April 29th, 2015 at 9:07:34 PM permalink | |
| Evenbob Member since: Oct 24, 2012 Threads: 146 Posts: 25011 |
Not surprised. You don't seem like the settle down type, and you've already been stomped once. If you take a risk, you may lose. If you never take a risk, you will always lose. |
| May 9th, 2015 at 7:47:37 PM permalink | |
| Face Member since: Oct 24, 2012 Threads: 61 Posts: 3941 | DIY Garden Pond. Why not? It is a f#$% ton of work and not-insignifacnt maintenance. Then again, everything is relative. And they really do add a hell of a lot to the scenery and general ambiance, so with labor being the big cost in any project, why not DIY? I won't give a list of "things you'll need" as there are options and need description. Instead, I'll do it step by step. First, you need a location. Spend some thought on this instead of just making a hole. You want the spot to be as level as possible, since you can't just tilt the pond to fit (water doesn't tilt, ldo). If you place it uneven as I have you'll either A) have one lip below ground level, which will cause rain runoff to flood your pond with mud, or B) have one lip raised well above ground level, which looks sloppy. Save yourself the effort and frustration and put it somewhere level. Also keep in mind where it is relative to everything else. Since you will want it filled to the max most of the time (otherwise it exposes a bunch of the liner which isn't pretty), a stout rain will flood it. When it floods, what's gonna happen? Right against the house puts your basement in danger. If it's in a low spot of the yard/garden, it's gonna flood and not move. When the waters recede, you're pond is gonna fill with junk. Think before you do. Also, if possible, think of what used to be where your hole is going. Mine used to have shrubs. That was an extra 4 hours and use of the truck to dig out and pull stumps and root balls. So use your head. Or do it my way and be an idiot, I don't care =p Some additional thought needs be done if you're going to have life in it. Fish and plants need certain amounts of sun and cover. A nearby tree is great to keep your fish from frying. Not so great when the flower petals and leaves begin to fall. Once you have your spot, you need little more than a shovel and "Satan's Implement", the wheelbarrow. Digging sort of depends on how you're going to build your pond, which I guess I'll go into next. There are two ways to build a pond. One is through use of a shell, which I have. They're nice because they don't wear out due to UV, and you can rip them out and plop them back in quite easy. The bad is their size and shape is limited. There's no thousand dimensions for you to choose from. If you go to Lowe's / Home Depot, you have a choice of about 2 or 3 sizes, and each size has one shape. If you're northern folk and plan on having fish, no shell is deep enough to keep them over winter without some serious bubblers. The other is using a liner. These are unlimited in size and shape. The only limit is how big of a hole you want to dig. The bad is that the liner will wear out in 5-10 years, and they are week long projects to rip out and replace. Additionally, if you get a leak, the water pools under it and bubbles it up and out, and it's not the easiest thing to get them to lay smooth and not fold. They can be a real pain in the ass, these. If you just want a pond you'll just be using a shell, so that's what we'll do. So get your shovel and your barrow and start digging. Make the hole wider than need be, and check the depth with the shell as you go. It's easy for one person to plop it in and take it out again, so you can repeatedly check for depth and levelness as you go. Don't forget to push down on it, as that will reveal high spots from rocks or roots. It's easily visible through the thin plastic. Make sure you toss your dirt away from the very edge so you can get a good read on how deep you need to be when you test fit the shell. 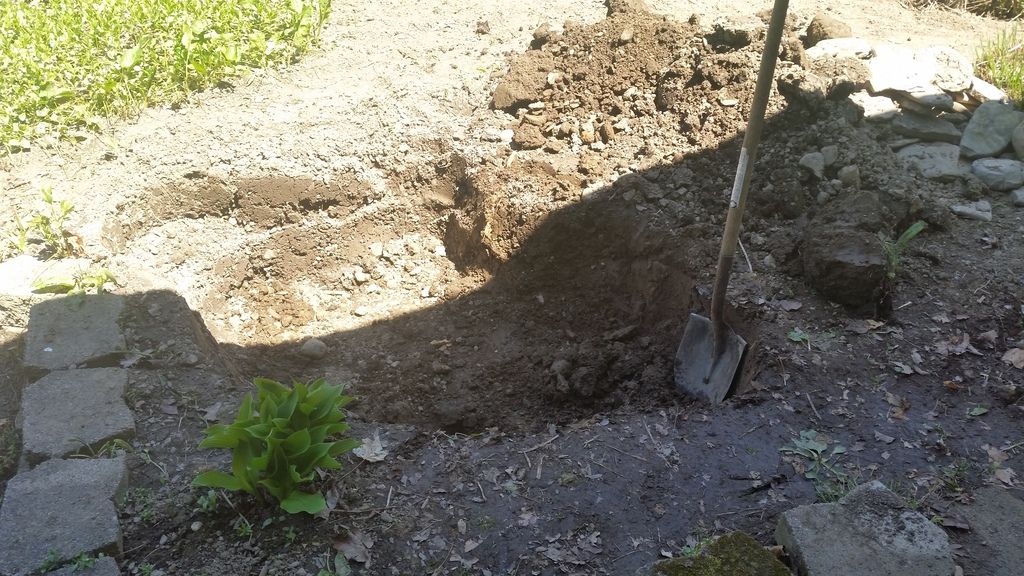 See all that dirt and all those rocks? That ain't 1/5th of what you'll be removing. It might be best to save the clean up until last, but if you must move material, save the big rocks and a large amount of the dirt as those will have a later use. The rest of it, that's your call. I used the dirt to fill low spots around the yard and the rocks for my aquarium. You can do what you want. But either way, a lot of material is gonna need to be moved. Remember to load that barrow correctly! 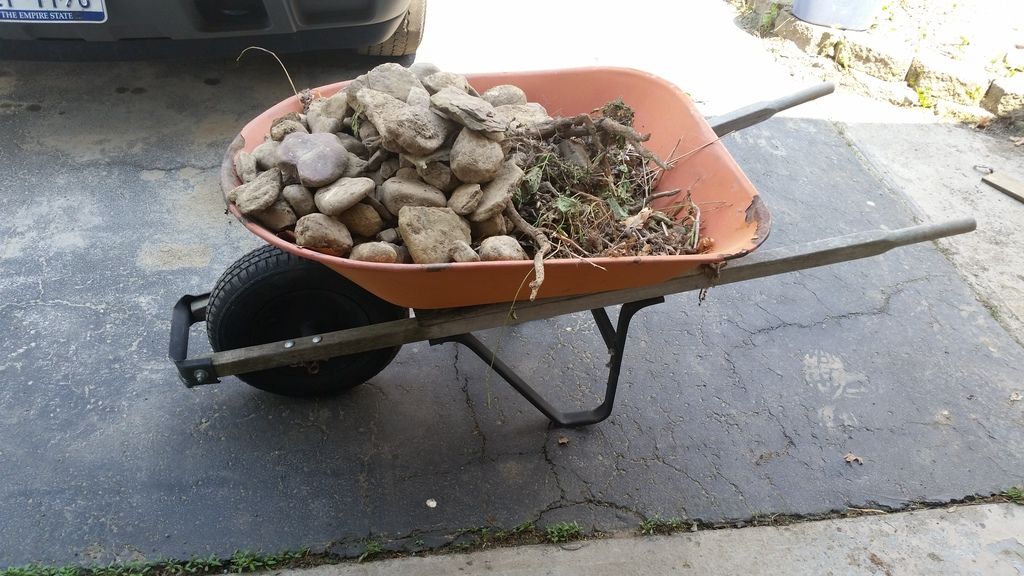 (I swear to all the gods this thing was almost weightless. Heavy in front = happy OG =)) Once you've got the hole dug and have test fitted the shell to be level, look around. Is there rototilling or weeding that needs to be done around the pond? If so, do it now. The last thing you want is to get completely finished and then have a tiller spray dirt all in your new pond. As you can see in the pic of my hole, all the tilling and weeding within 2' of my pond has already been done. Yes, I know this because I've f#$%ed it up before =p OK. Hole is dug, shell is level, everything is weeded. Get your shell in there the way you want it and start filling. You're not "filling" it yet, you just want some weight in there to keep it steady. 20 gallons is the weight of a man, so that's good enough. Now it's time to back fill. The large amount of dirt you saved will now be used to fill the voids between the shell and edge of your hole. This is best done by hand, scooping it in handful by handful. A shovel tends to spill a bunch of junk into the pond itself, and you don't want that. You also want to avoid cramming it in. Do so and you'll torque the shell out of shape. Just let it fall in ensuring to reach down and push it into voids and don't worry about packing it down until you get it level with the ground. Surprisingly, it doesn't settle much if any throughout the year. I had to add exactly zero dirt all year to address settling from not packing. Once you've got it back filled, feel free to fill 'er on up. Now, you need something to move the water. Fish or not, you need pumps and filters. Partly, it's because water features are pretty and add to the flavor. The other part is stagnant water is going to be nothing but a soupy green, mosquito infested stink hole within a week without it. The easiest is a fountain, whether one that just sprays straight up in the air, or one that looks like a baby peeing. Those are as easy as plugging in and pointing in the right direction. I prefer the waterfall because I'm a masochist (=p), and that takes more work. You can do the whole mortar route and go permanent. I don't have the skill, and my kid likes to walk all over the damn thing, so my only attempt got broken. I made mine out of dirt and the same kind of liner used to make the actual ponds. I just made a small dirt ramp (the darker colored soil in background) rising only 6"-8" and about 2' long. Of course, it ends right at the edge of the pond. 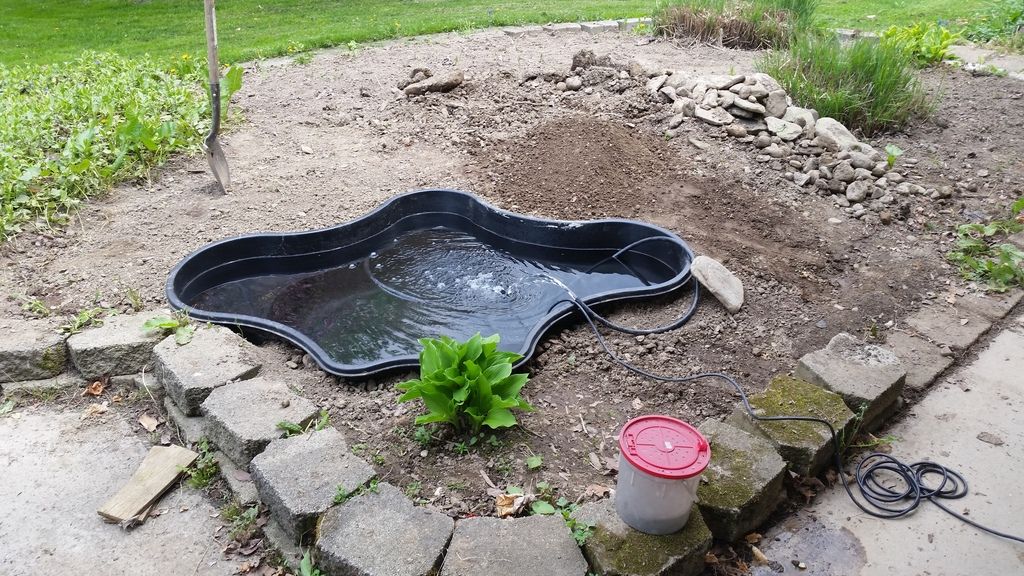 I made a small plywood frame, wrapped it in that pond liner material and stapled it in place, and then cut it so the liner made a long "cape" off the back end. The plywood portion hangs over the edge of the pond, so the water falls into the pond and doesn't run out. The cape runs up the dirt ramp to make it all water proof. Once I have it set and sort of wrapped over my dirt ramp the way I want it, I fill the "chute" with the large rocks I have lying around, and then cover the edges of the cape with dirt and more rocks. That way, my water can't escape and run out the sides, and everything is mostly covered with natural stuff so you can't see it (I still have work to do to make it more inconspicuous =p).  The pump hose then comes up under the edge of the water fall and runs down the side of it to the back. At the back I turn it and bring it up to the top, covering all of the hose with rocks. The power cords come out of the pond and then immediately into the ground where I bury them shallow by hand. They pop out at the edge of the garden where I have an extension cord with a 3 split plugged into it. Tuck it all away, plug it all in, and you're done (with Step 1 LOL (sort of kidding =p)) 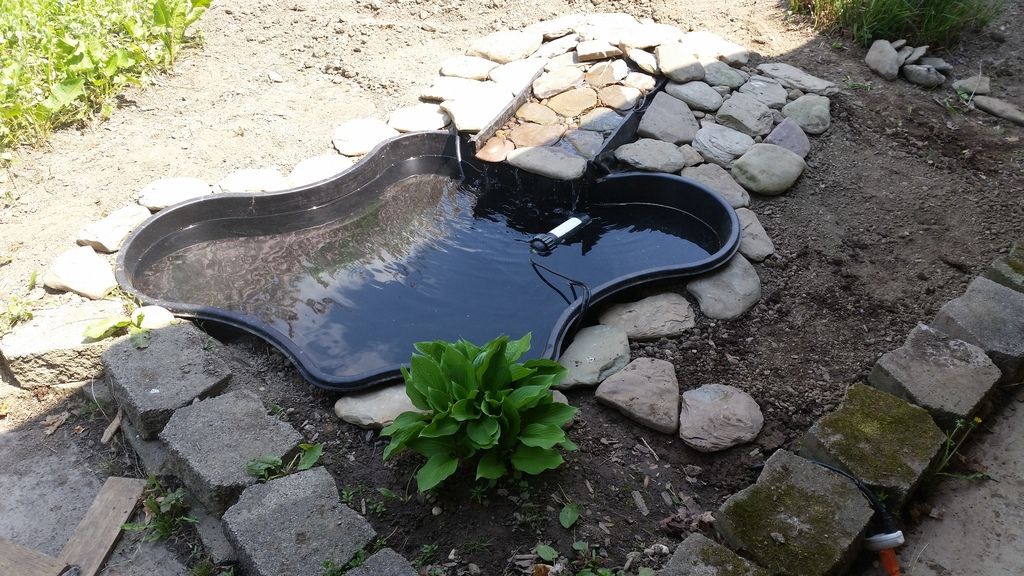 The rest is maintenance and making it pretty. To keep it clean and clear, you need a mix of filters and chemicals. First is my mechanical filter. It's just a box that holds the pump. Inside the box with the pump are little plastic spiked balls. These will grow beneficial bacteria to process the ammonia and whatnot from fish waste and rotting detritus. On top of those are two sheets of sponge, one very course to catch leaves, flower petals, and the like, and under it a very fine sponge to catch dirt, algae, and other fine particulates. From the pump it goes into a UV filter. This is little more than a tube that has a UV bulb in it. As the water passes through, the UV zaps all the microscopic life, severely reducing algae blooms. That light works a GD treat, I'll tell ya. Other than that, I just use barley. Rotting barley releases an acid that keeps algae in check. You can just toss a bale of actual barley in there, but then you have a ball of rotting vegetation floating around. I use the extract, which is sold anywhere that sells garden supplies. A capful every 2 weeks or so, plus my filters, and I had clear water no matter how much it rained or how much it sunned. This with 6 or so larger fish and a mess of plants growing in it. Fish and plants are easy enough. Goldfish will keep just fine, as will just about any fish you catch at the crick or pond. Don't put your $20+ fancy fish in there. Birds and coons do exist. But a mess of goldfish will keep just as good out there as they will inside. Just remember, if you keep them indoors over winter, they will be bigger and bigger every year. Like, 2lbs, easy. I've seen some insane garden goldfish. Water hyacinth is retarded easy to keep. Hardest thing is keeping it in check. One bulb will sprout enough to cover this whole pond in about 2 months. It's great to get cover quickly, and pruning it is as easy as snapping off however much you want to get rid of and tossing it in the weeds. Plus, it's a floating plant. No planting to worry about or dirt to mess up your pond. They just float around providing cover and soaking up all the nutrients that would otherwise cause an algae explosion.  And that's all there is to it. Maybe $125 for the shell, $60 for the mechanical filter/pump, $80 for the UV, $25 for the liner to make a waterfall, $10 for the barley extract, $5 for the hyacinth. $300? Have a landscaper do this exact job, and the waterfall will look much better. It will also cost you $3,000. And although it may look a bit rough and spartan at the moment, just a bit of actual gardening work can really make it sparkle. 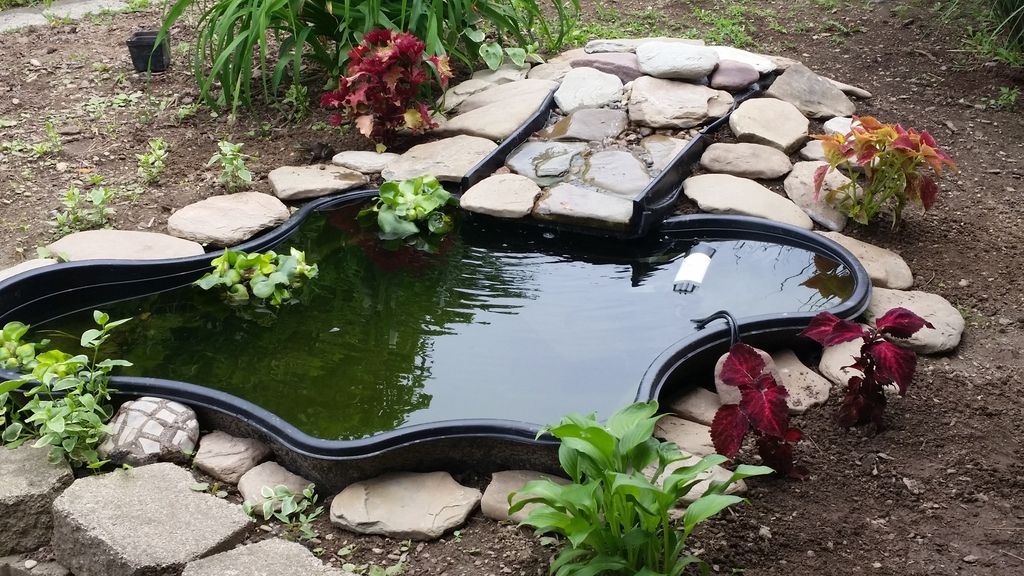 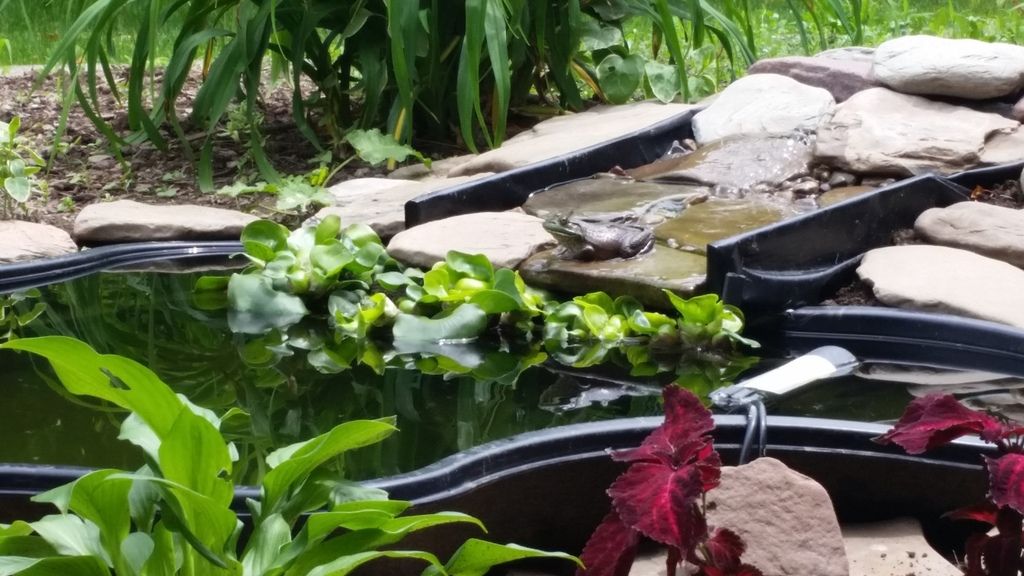 Just remember, while your new plants are going to love the freshly turned and weed free soil, so does every single other GD thing on the planet. If you turn your back for one second... 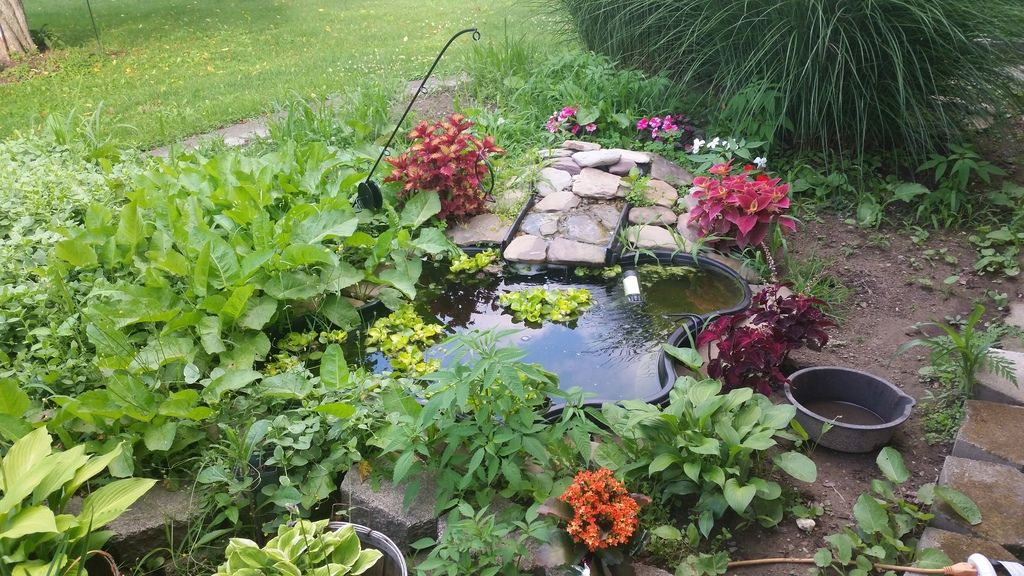 Happy digging =) Be bold and risk defeat, or be cautious and encourage it. |
| May 10th, 2015 at 3:35:16 AM permalink | |
| AZDuffman Member since: Oct 24, 2012 Threads: 135 Posts: 18212 |
Looks nice! As to the dirt, I once had a guy arguing with me that the way to get rid of all the dirt was to dig a big hole and bury it. Kind of my fault as I said you could do that as a joke but when I said it was not possible he just said it was. As to fish, correct. My mother lost all of her fish over 1-2 nights. They were out there a year or more until one night and *poof.* One was a nice black and gold colored one we called the "Steelers Fish." For those who want to keep fish what you should do is get some bird netting and put it across the surface. It comes in black so from far off it does not look horrible and it keeps the leaves out as well as predators. The President is a fink. |
| May 10th, 2015 at 10:58:37 AM permalink | |
| odiousgambit Member since: Oct 28, 2012 Threads: 154 Posts: 5112 | awesome, Face! I'm Still Standing, Yeah, Yeah, Yeah [it's an old guy chant for me] |
| May 10th, 2015 at 3:04:46 PM permalink | |
| Face Member since: Oct 24, 2012 Threads: 61 Posts: 3941 |
Thanks =) Pops has a pond with that netting you spoke of. His is the liner type and is very deep, so no need to keep critters out of it. But it's a lifesaver come fall time, where it keeps all the leaves out of it. I use nothing and haven't lost a fish or a frog yet. Of course, I don't get cranes or herons up here, and all my fish are on the bigger side. And that waterfall could easily have been done more inconspicuously. When I first attempted with the mortar, I got halfway done when it started raining. Instead of setting like concrete, it set like firmly packed sand. I had to dig up and start over, and so much time had elapsed without running that the pond went green. So green in fact that I had to drain, pull, wash, and replant the entire thing. My second attempt likewise got halfway when my kid stepped on it and cracked it. By then I was so frustrated with the mortar and panicked about the algae that I just needed to do something now. I ripped that plywood with a saws-all and threw it together in 15 minutes, not thinking it through or measuring or doing anything other than ensuring I could run water on it now. After seeing how it works, I could easily cut those edges down from their current 4" to just under an inch and get all of the frame and the liner completely covered with dirt and rocks, save for the little bit that hangs over the edge and would blend into the black of the pond shell anyways. But this year, since I moved it to address the lip hanging so high off the ground, already took so much work that I just ran it again. Maybe next year =p Didn't have it running but 12hrs before I got my first resident =) 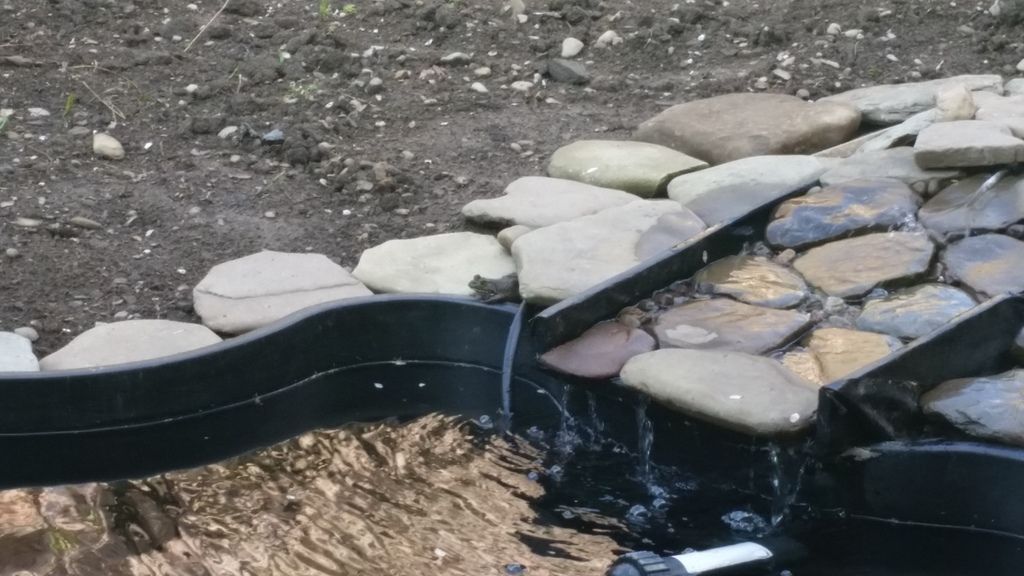 Be bold and risk defeat, or be cautious and encourage it. |
| May 10th, 2015 at 4:10:29 PM permalink | |
| AZDuffman Member since: Oct 24, 2012 Threads: 135 Posts: 18212 | RAMP TIME Last week or so yours truly asked about any advice to put in a ramp. Finally the time came, the weather held, and I got the thing built! More of a Father's Day gift installed on Mother's Day but don't matter none, thought that counts, right? Came in under budget, ruined only one piece of wood, and most amazing the time it took was nearly exactly what I had allotted once you "normalize" it as there was a small detour or two that work had to stop. Anyways, first thing was make a pre-cut that I would not be able to do effectively on-site. What I needed to do, and should have asked for advice here, was tale a 5ft section of 2x6 and to a rip-cut on an angle to make two right triangles, then do it a second time to make 4 stringers/joists. This is not easy to do freehand and the table saw was to my surprise no help. My brother came up with the idea to screw them together and cut both at once, so at the least if it was out of whack it was universally out of whack. It worked even if it needed some sanding but does anyone have a trick for this kind of cut? Not bad for one hour yesterday, five today, and an hour of shopping. The dog took some getting used to it. My dad was proud and now he gets to show the neighbors what his kid built, basically unassisted. He said I was "good with wood" which I am not so sure, just better than I used to be. Hopefully I get better on the next thing. Now, who has the next project? Up early and load up all tools I thought I might need. Chop saw, horses, speed-square, clamps, the all-important impact gun, and some other items. Get there, unload, and off to THD. It always makes me happy to get the "U" out of my SUV.  Sharp readers will see I have no flag, THD is less than a mile away and if you walk five doors up the street you can see it, so I just blew it off. No issues. The step in question is just 8" high, probably was even less than that when the house was built, but stuff sinks in 55 years. Even at that, for the dog and the old man, it is not an easy step.  I had the idea perfect, and started easy. Just cut I guess called the header plate. Wanted to cut it first because it came from 2x10 and when my dad would come out he would try to help and it is just too heavy for him. BOOM, got it done. Next the decking. Learned a lesson the 10' sections are really about 10'0.5", so multiple cuts needed. But when I laid the joists I got worried.  As you can see in the picture, there is about 3" of gap below the step. I tried laying the joist on some 2" lumber to shim it up, which left a tripping hazard. Plus at the end of the stringers the wood is paper-thin, it goes to literally nothing. Needed a way to secure the decking to it. My dad didn't see the tripping hazard and my mother, well her ideas were unusable because they are against the laws of basic carpentry. I'm not even at journeyman level, but I do know some things you cannot do. In the end I cut the joists to fit the "patio pad" and used our old friend, liquid nails, to help the final deck piece. I used one course of screws on it instead of two while slathering the aforesaid liquid nails. In the end it worked, BUT..........  Look at the top right side of the ramp and see where the back goes like an inch past the ramp but is flush on the other side? Hard to see in the pic I know. Most people would not notice. Most others would not care. My dad told me to ignore it when I waned to rip it out and re-cut after I laid the third piece of decking. Because *I* knew it was there and it would drive me crazy that I did something 99% that was so simple. BUT! I had been planning on putting "trim" on it so that if a person was walking to the edge their foot would be gently guided back to where it belongs. BOOM! I just cheated the trim over to look in line and now only you all and I will know!  The President is a fink. |
| May 10th, 2015 at 5:44:34 PM permalink | |
| Face Member since: Oct 24, 2012 Threads: 61 Posts: 3941 |
I'm having difficulty picturing what you're explaining. Do you mean angling the end of the 2x6 so it sits flat on the concrete? That's all I can assume you're talking about. If so, then no lol. I didn't even have that keen idea of screwing them all together so they were uniform. I just set mine on the ground in place, looked at it, drew a line, looked at that, and figured it looked Good Enough. Grabbed the circular saw and ripped it. Worked just as I had imagined it would =) Though in my case, my step must have been much higher or the ramp much longer because I didn't have to cut near as much. Between the low height of the step and the fact that you didn't build to the very top of it, it looks like you had to rip damn near the entire five feet of length. Were it me, I'd likely have went to 2x4 for the joists. With my sh!t saw and its sh!t batteries, it would've taken three or four charging cycles to get through 20' of wood. 2x4 would've given you less to cut. Sorry, I know that's not entirely helpful =p Otherwise, looks good! Not much to question or critique, other than wondering if "mom and dad" are also "grandma and grandpa". If that was my family's, there would be a ton of kids up and down it. And those kids do weird stuff, like stand right on the very edge of things. I know my own would be loosening up that cheater trim as we speak if it were at my house, and I'd be screwing in little support blocks under it, lest he eventually ripped it out =p And you said you were gonna use some sort of skater tape or abrasive paint for non-slip, so I don't have to give you a virtual bonk for exposing those lumber stamps XD Just being picky because, well, treat others how you want to be treated. "Looks good" is great for the ego. I don't want to "feel better", I want to "be better". Figure you're the same, so I nitpick. But that's really all I can gripe here.
God, so many! All I can do is sit and think of stuff to do. I just don't have the capitol to do it, and as soon as I do, I won't have the time >< Short term I'm gonna try Wood Table v2.0. Gramps has an old chicken coop he wants gone, so I'm gonna disassemble it instead of demolish it and see if I can harvest some of the wood. Built in the 50's, it might be a lost cause. But there might be enough salvageable to make an old, seasoned, rustic table out of, and I need a new computer desk. If there's enough plus some, I'm thinking couch. I haven't had a couch in years. Long term, I'm still planning a trailer. Mom just bid on a house right up the road, and it has a huuuuge barn on property. Cement floors, full walls and everything. Once I can free up about ~$1,500 I'm gonna take a whack at making a car hauler, just to see cost / time / saleability. I just miss welding and grinding, and with the cost I see car and garden trailers going for, it seems like I should easily be able to turn labor into race car parts. Maybe next time I'm bored I'll start shopping materials... Edit: Oh, and long-long term, something similar is all but guaranteed...  Be bold and risk defeat, or be cautious and encourage it. |