 |
 |
Do it yourself
| April 14th, 2015 at 11:13:31 PM permalink | |
| Face Member since: Oct 24, 2012 Threads: 61 Posts: 3941 | I can't picture what you're describing, so let's start there. Pool light through 30' of conduit directly to breaker. I must assume the cord for the pool light exits the pool structure somehow (I don't have a pool and never had lights when I did, so I'm lost on experience here). What I envision is the previous light had a cord coming out of the pool that was long enough to exit the pool, go through the conduit, and enter directly into the breaker box. Based on what you described, it is all that can be. So your new light must also come out of the pool, somehow. It's just not long enough to make it back to the breaker. So I don't see why you can't leave your light and all it's connections whole, run the new line out of the pool as it's supposed to, and just splice the dry end of the new wire into the old line that's already run through the conduit and hooked to the breaker. Once out of water, splicing lines is the easiest task in the world. Do it right and all the material will cost you about $0.70. Help me out here =) Be bold and risk defeat, or be cautious and encourage it. |
| April 14th, 2015 at 11:14:22 PM permalink | |
| petroglyph Member since: Aug 3, 2014 Threads: 25 Posts: 6227 |
I don't understand, why change over to the led from what you already had? I would think a new light and seal would be a lot easier and way cheaper. I know some around here are changing to the led because they get the color changing/rotating whatever effect. And then some are changing them over thinking they will save electricity, which is laughable. I also wonder if you will have to drop your water level to make the swap? I still vote for asking the pool guy to do it. I have done tons of home stuff, but I really really respect my pool guy, he is a professional and takes refresher classes on the latest and greatest methods yearly. My knowledge of my pools water balancing needs is much simpler. I also know quite a bit about electricity, but recently we had friends over from out of state and he is an electrician wanting to help out. It took me days to find something for him to do. I finally sicked him on the auto shut off on the pool heater and an outside gfci. I would probably have let both projects slide until, at least they didn't work. It is enjoyable to watch any professional at his craft. You just can't beat a man at his own game. We also don't know the integrity of the underground conduit? It may have silted in over time and replacing the conductor may not be possible. The last official act of any government is to loot the treasury. GW |
| April 15th, 2015 at 3:09:40 PM permalink | |
| DRich Member since: Oct 24, 2012 Threads: 51 Posts: 4973 | Face, maybe what I didn't mention is that it is an in-ground pool. The light is installed approximately two feet below ground level into the "cement" wall. The conduit is also ran two feet underground until it gets back to the breaker box. I don't have a good picture on me showing the light in the pool but below is a picture of the pool and the light is on the far wall about two feet below the surface. The breaker box is about 20 feet to the right of where the picture is cut off.  Petroglyph, normally there is not a need to drop the pool level because the light housing comes out with one screw and there is enough excess cord to lift the housing up onto the deck to replace bulbs. My pool guy won't do the install because the cord is too short. He would have to break up the cool decking to dig down to the conduit to add a junction box. At my age a Life In Prison sentence is not much of a detrrent. |
| April 15th, 2015 at 4:57:01 PM permalink | |
| AZDuffman Member since: Oct 24, 2012 Threads: 135 Posts: 18222 | Well, I didn't do the fanciest job here but I am kind of happy with myself. Three years of remodeling and I finally get to clearing the basement and making a workspace of sorts. First job was painting walls and floor. Then I actually turned a pile of wood into some real manly shelves:  The one might look a tad crooked but when they are placed in final position they will be bolted together for yet more rigidity. If I sound happy with myself, it is because I am. I have attempted to build various things over the years and many failed. I was the kid who got a better shop grade because I had "lots of heart even if terrible hands." For what might be the first time in my life I had the trifecta of all-new building materials, almost all the right tools, and the confidence to do the job. I know I am no carpenter, but right now I could go down to the basement just to look at the darn things. Lessons learned? 1. It is a poor craftsman who blames his tools, a good craftsman can work with bad tools and still do a better job than an unskilled person. OTOH good tools will not help a poor craftsman, he will still do terrible work. But being somewhere above bad, having the right tools did help. 2. If you do not have a helper you must innovate. I did not have a helper and struggled through the middle 50% of the job. But by the time I got near the end something clicked and the rest was much easier. Next time I would make a few jigs to hold it together as I assembled it. 3. Think about what you want to do. I had a totally different idea a few weeks ago, then on youtube about something else I saw some shelves and improvised. The new ones are almost twice as deep and will be better for starting plants and mushrooms as well as storing all kinds of stuff. 4. The tool thing is addictive. I had a borrowed chop saw, level, clamps, impact driver, and wrenches. The chop saw and impact driver really took the ouch out of and made the first phase fly by. The clamps I had been collecting for just such a project as I used free Harbor Freight coupons. So far no problems. But then I think about how I should get a better vice. With that a 2 wheel grinder. Of course, then I kill time looking for cheap, used drill presses on craigslist. But not just the drill press but maybe a very basic welder and for sure an air compressor. But maybe an upright compressor if the price is right, because that would rub a blast cabinet. Watching "American Restoration" after I was done for the night does not help there. There must be a reason at mid-life that you want to start building this stuff. The President is a fink. |
| April 15th, 2015 at 6:05:21 PM permalink | |
| petroglyph Member since: Aug 3, 2014 Threads: 25 Posts: 6227 | Right, that is how they are supposed to be. I thought you could just replace the light "as is"? Is that not possible or you just want the new one? Well he sounds like he has integrity, good for him. Sounds like a pro. As far as "jerry rigging" a splice underwater, of course there are materials for slicing cables underwater. There are fiber optic lines, communication and power strung under all the oceans with lots of splices. What do the guys that sold you the light say? Yours is not the first to be this way. Very pretty "digs" you have there by the way. The last official act of any government is to loot the treasury. GW |
| April 15th, 2015 at 7:54:13 PM permalink | |
| Face Member since: Oct 24, 2012 Threads: 61 Posts: 3941 |
"Never leave to a professional what you can do yourself in half the time and a tenth the cost" - Good Enough LLC. As owner and proprietor of Good Enough Inc., I've got it all figgered out. Well, almost all figgered out. I still don't really understand the water issue on account of not having pool experience. Your light is 2' underwater. So that means the wire for it must exit the pool shell below the water line. When you pull the light assembly out, what keeps the water from draining out down the conduit, through the hole cut for the wire? I'll assume there is nothing, because even if there was something, it would still leak and your conduit is now filled with water. So waterproof splice it is. I assume you can remove the light, strip and prep the ends, and all the normal stuff without direction, so we'll pick it up from there. Slide some shrink wrap down one end and leave it. You'll want it later and (duh) you can't put it on later. I say "duh" because I do this in 50% of my wiring. Cut, strip, twist, solder, shrink wr... S#$%!! Forgot to put the shrink wrap on first. Don't do that. Don't forget. Twist the lines together. I imagine there's two wires in each cord. One into one, one into the other, not all four in a jumble. Do not twist them like this...  Do so and the twist sits perpendicular to the wire and you don't want that. Get some pliers and strong hands and try a Western Union Splice... 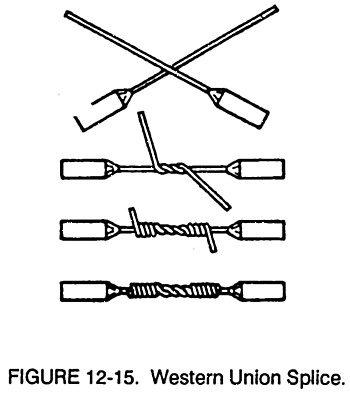 That way, everything is straight and flat. You'll want that later. I assume the wire will be one single, thick wire , like a coat hanger. If it is, good. If not, if the wire is made of several filaments, you'll want to solder that connection together. At least I would. You do what you want. Once you're all twisted to satisfaction, you're going to slather on some liquid electrical tape. You can get this at any hardware store for between $5 and $10. It's a lot like rubber cement; I'm sure you can manage the application. Make sure you fully cover the exposed wires and drag it up to and on the rubber insulation of the cord. Let it dry. Reapply if you're feeling particularly frisky. Now is dealer's choice. I might fancy using some hot glue just for an extra layer. Of course, you will burn the s#$% out of yourself doing this. No way around it. If you too fancy a bit of burning, plop some of the hot stuff over your splice then quick as a whistle slide your shrink wrap over it. Ignore the rising blisters and get some heat on it so as to shrink that tube tight over the soft glue. Oh, and make sure the liquid tape is dry before heating the shrink tube or it'll set on fire. It'll probably set on fire anyways, but you have a pool there. Ain't like you're gonna burn the neighborhood down. If you want to avoid burning, skip the glue and just do the shrink wrap. Once the shrink wrap is on, shrunk, and cooled, wrap it tightly with normal electric tape. Stretch it, don't get any creases or folds in it. And keep your fingers off it, you'll foul the adhesive. Once that's on good, run another coat of the liquid stuff all over it and past the edge of the tape onto the insulation. Let dry. Boom. Done. Which ever kid has the lowest grades or did the least chores is first in the pool. In case of no children, in-laws are a suitable replacement. ***Good Enough LLC guarantees no work done by outside contractors. Use of this DIY is at the home owner's own risk*** =) But seriously, that's what I would do, and I would do it. I've done a lot worse and I'm still doing things. Be bold and risk defeat, or be cautious and encourage it. |
| April 15th, 2015 at 8:08:05 PM permalink | |
| Face Member since: Oct 24, 2012 Threads: 61 Posts: 3941 |
To a point lol. I get what you're saying, but I can't help but argue. Some of the stuff I use makes Harbor Freight look like a Swiss watch. Just god awful. It's always a joy when I can dip into my really old stuff, much of which was handed down from my great grandpa. I just today used a drill bit that ain't been honed since The War, and it went through that poplar leg like a light sabre.
Do you ever! But I've found, and you can correct me if I'm wrong, that whatever irritation you find doing things "Marco Solo" is given back to you two-fold in pride when you're done and can say "I did that whole thing all by myself" =)
For sure. My table has with it a 4"x 9" scrap sheet of paper with doodles on it. Just rough sketches of the profile, top, and corners of the table I fancied building. It sort of let's you build it before you actually put saw to wood and ruin a bunch of material. I didn't make one errant cut as a result.
Went to Lowe's today just (JUST!) to get some $2 gliders to finish off the table. Left with the gliders... and a belt sander. I won't need it again for ten years. But when I need it, I freaking need it =) Be bold and risk defeat, or be cautious and encourage it. |
| April 15th, 2015 at 8:11:37 PM permalink | |
| Evenbob Member since: Oct 24, 2012 Threads: 146 Posts: 25013 |
No No No. "Never leave to a professional what you can do yourself in twice the time and a ten times the cost" That's a true handyman. If you take a risk, you may lose. If you never take a risk, you will always lose. |
| April 15th, 2015 at 9:13:57 PM permalink | |
| petroglyph Member since: Aug 3, 2014 Threads: 25 Posts: 6227 | That image appears to be a "mirror" image. The connection appears to have recently been encased in a "wire nut", which twist to the right. I don't usually see the conductors wrapped cc. The Western Union splice explanation was excellent, and definately, Old School. If you are doing low voltage connections, make sure the conductor is clean before sealing. imo If you are going to solder it, flux it. The last official act of any government is to loot the treasury. GW |
| April 15th, 2015 at 9:39:30 PM permalink | |
| Face Member since: Oct 24, 2012 Threads: 61 Posts: 3941 |
Probably, but it's the closest I could find that sort of showed what I meant. Many people, myself totally included, cross the wires like the beginning of the Western Union, but just twist them up around the "ends" of the wire instead of around the "line" of the wire. So you end up like the one above. Pull the wires away from each other and the splice pops straight up, perpendicular to the way the line is lying. Which, if you're trying to get a good seal with tapes and shrink tubes, is garbage. The WU will lie flat in line with the wire. Now your seals and tubes and tape should go on much smoother and give the perfect seal. Be bold and risk defeat, or be cautious and encourage it. |